Sides

Old Bay Lemon Fries

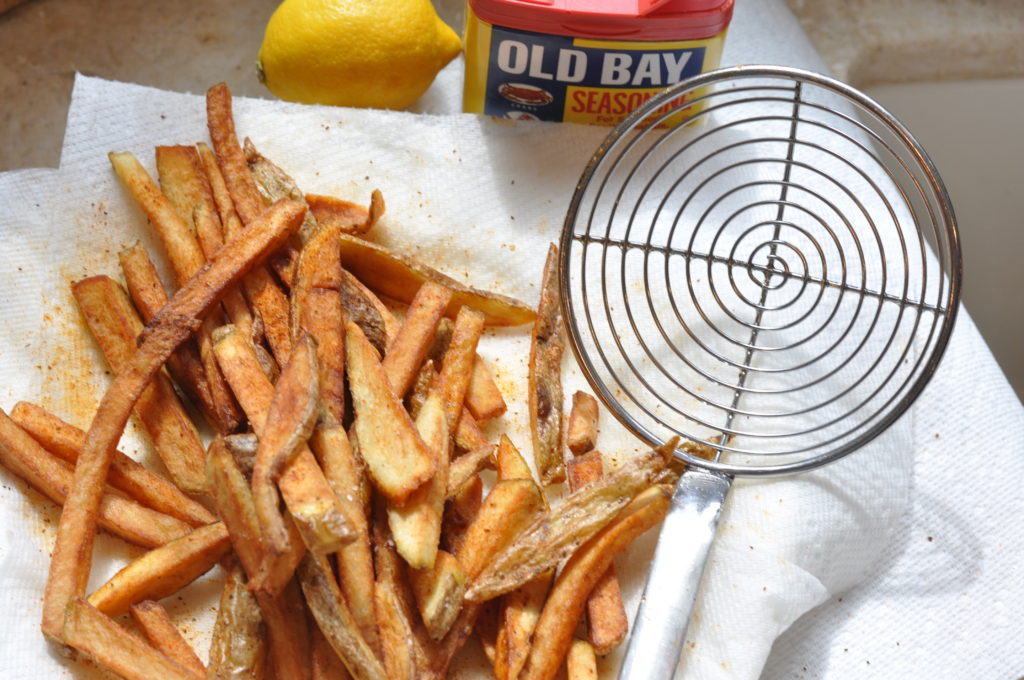
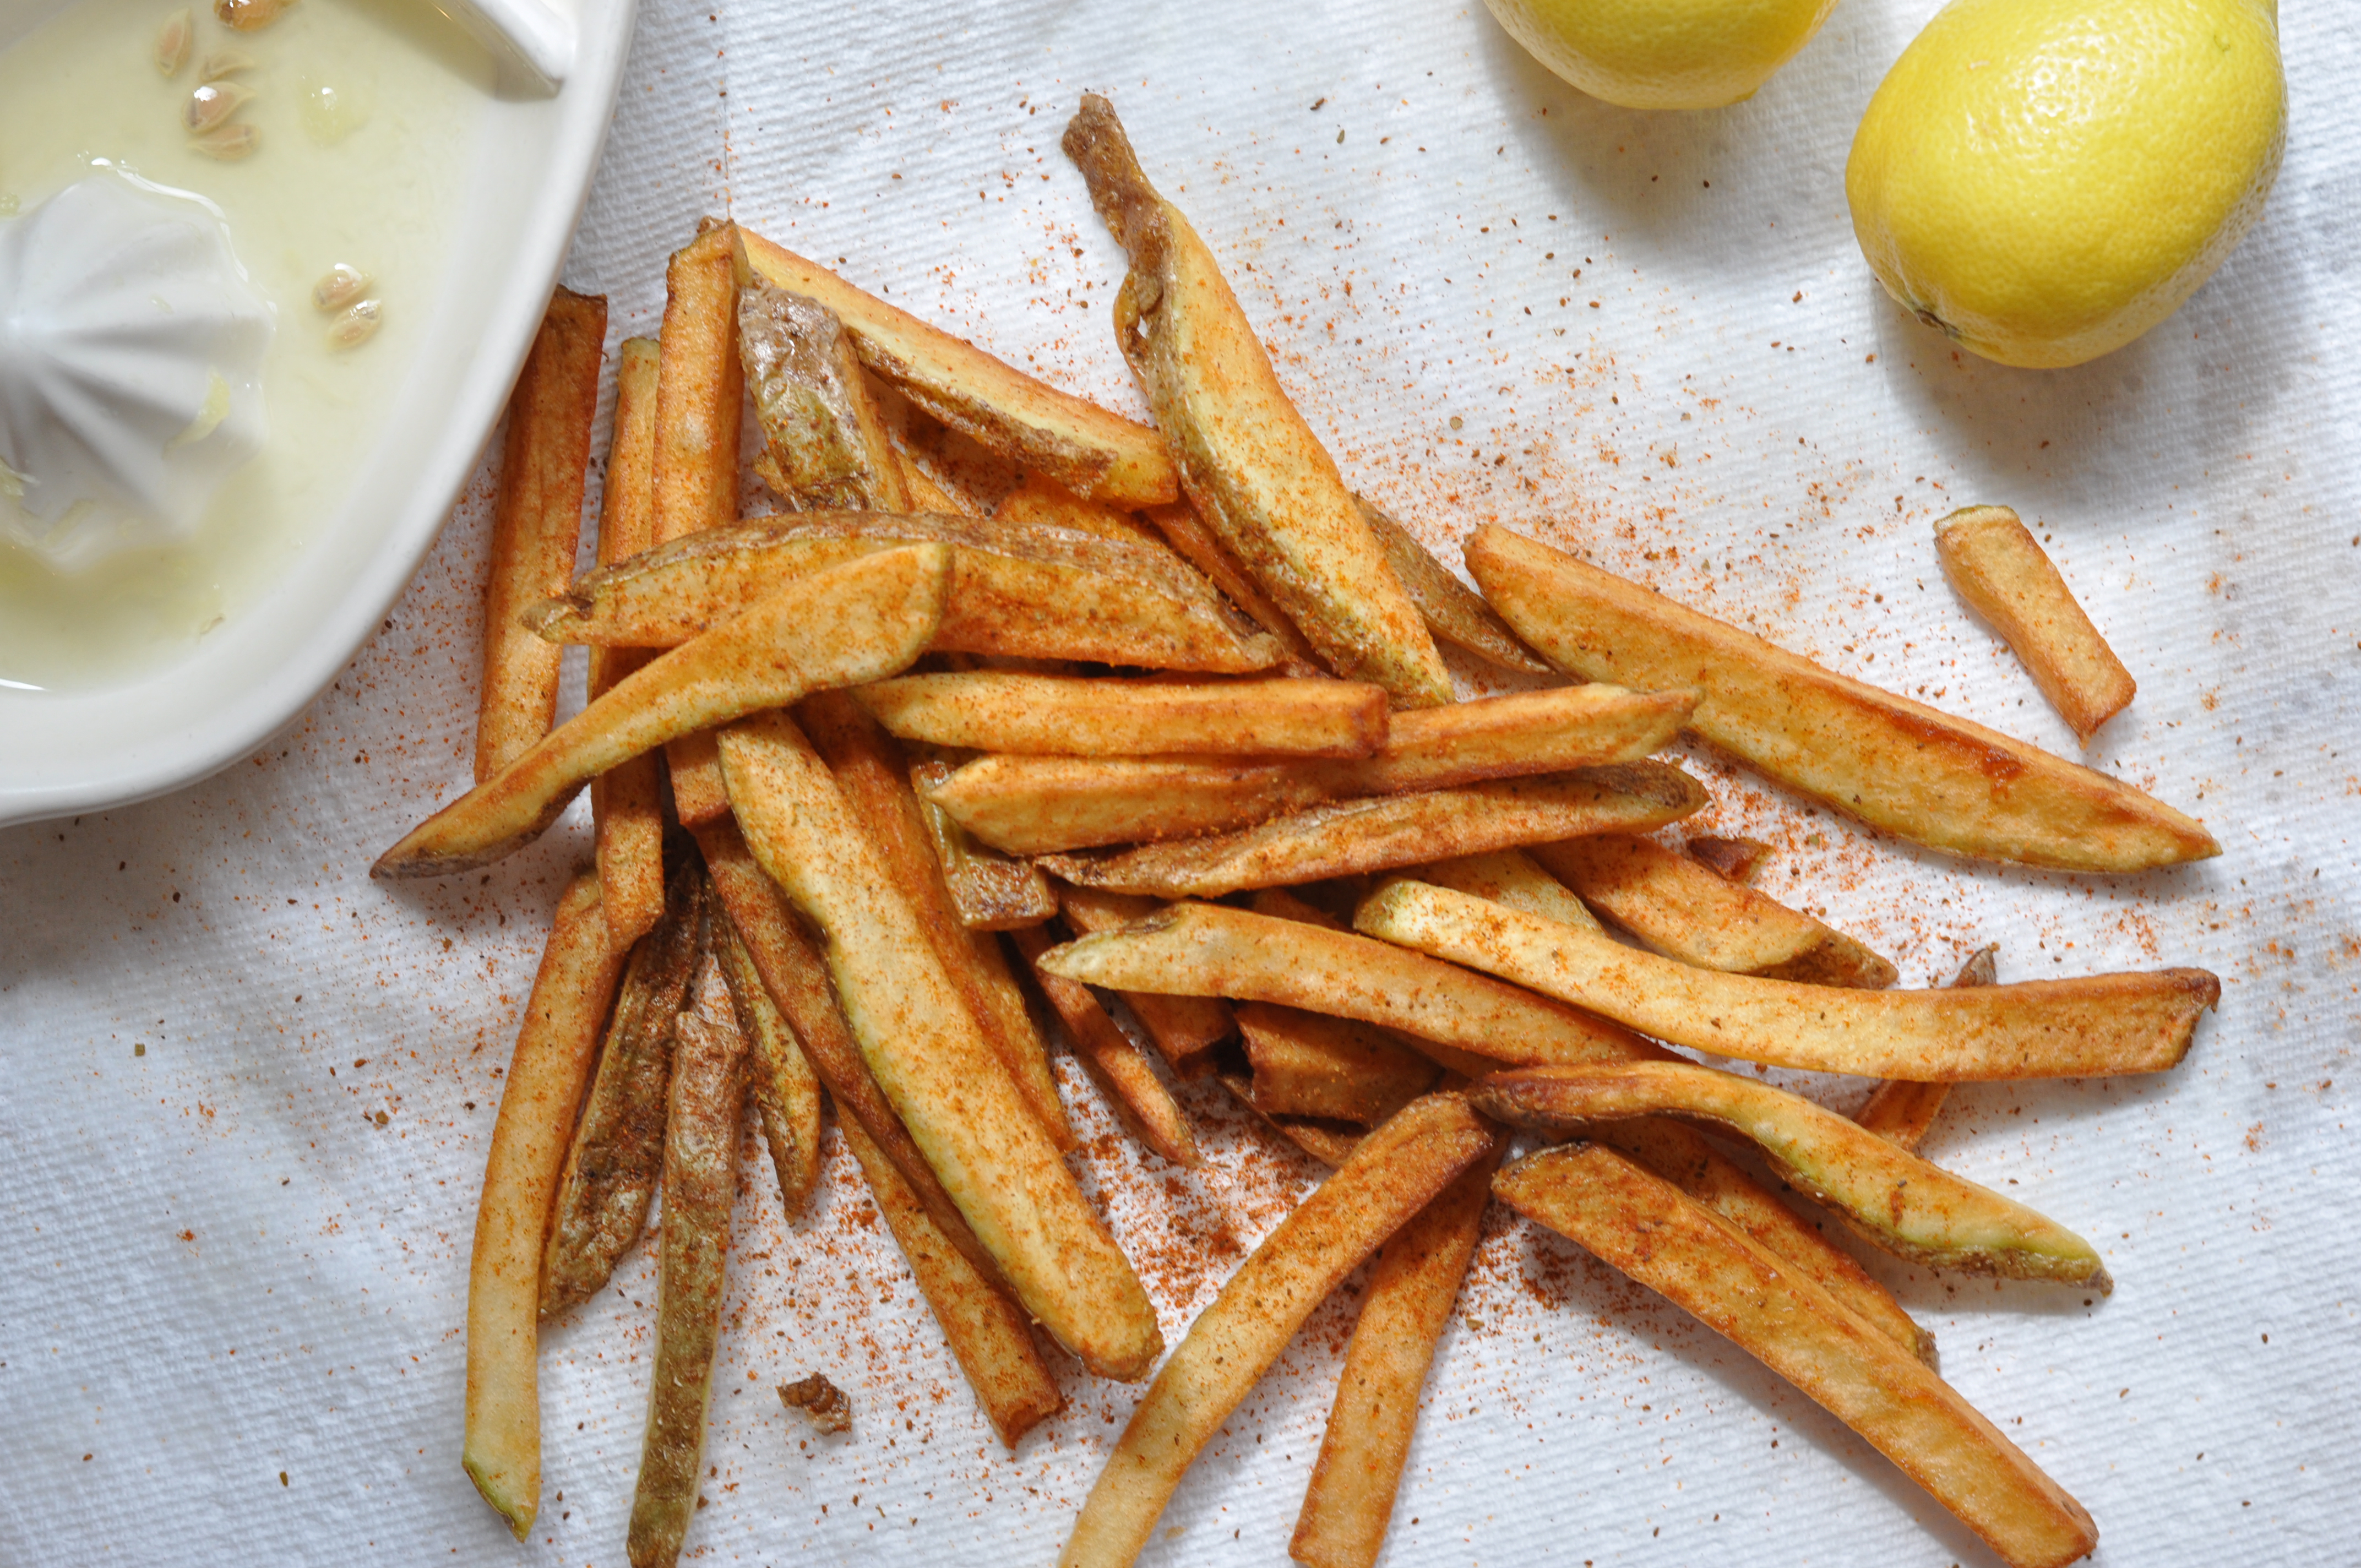
These fries cross the Greek Islands with the Louisiana Bayou.  The Greek always squeeze fresh lemon juice on their fried potatoes, and to be honest, I’m not sure why everyone doesn’t do this because it’s just delicious. I top my lemony fries off with a generous sprinkle of the classic Old Bay seasoning and the result is a salty, tangy, crunchy batch of french fries that you will have trouble sharing.

Old Bay Lemon Fries

1 Star2 Stars3 Stars4 Stars5 Stars (No Ratings Yet)
Loading...
By Liz Serves: 6
Prep Time: 2 hours Cooking Time: 15 Minutes

A full proof way to make delicious homemade fries that will taste better than anything you've had in any restaurant.

Ingredients

  • 3 Russet Potatoes
  • 2 cups of Peanut Oil
  • Old Bay Seasoning
  • 2 Lemons

Instructions

1

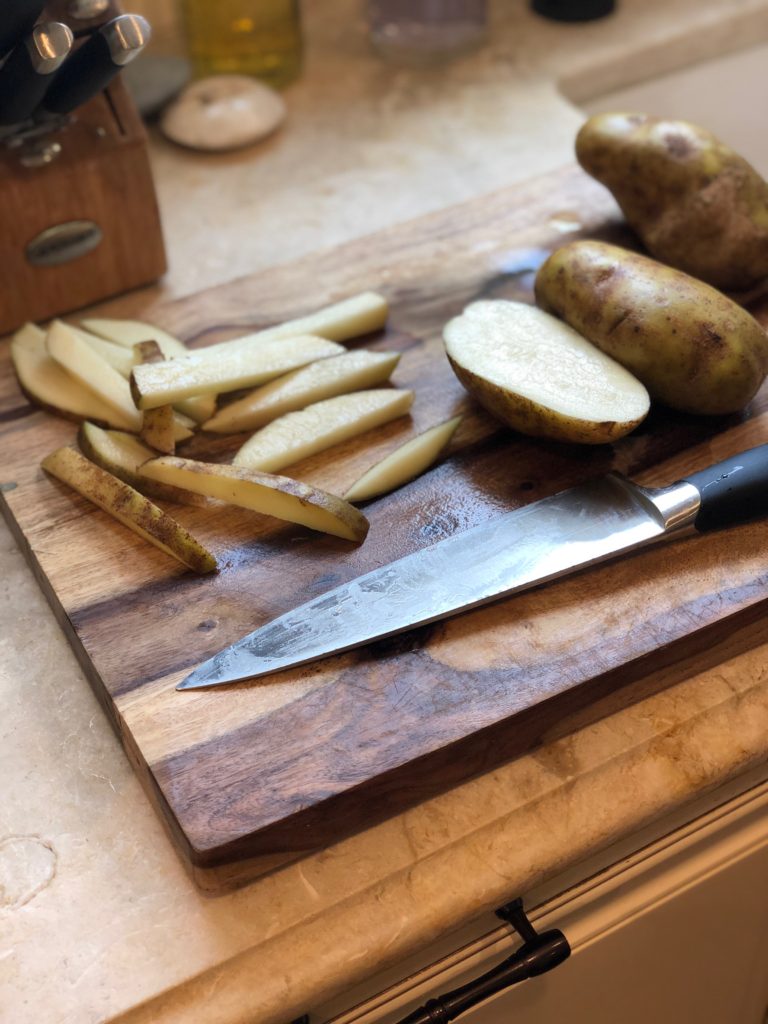
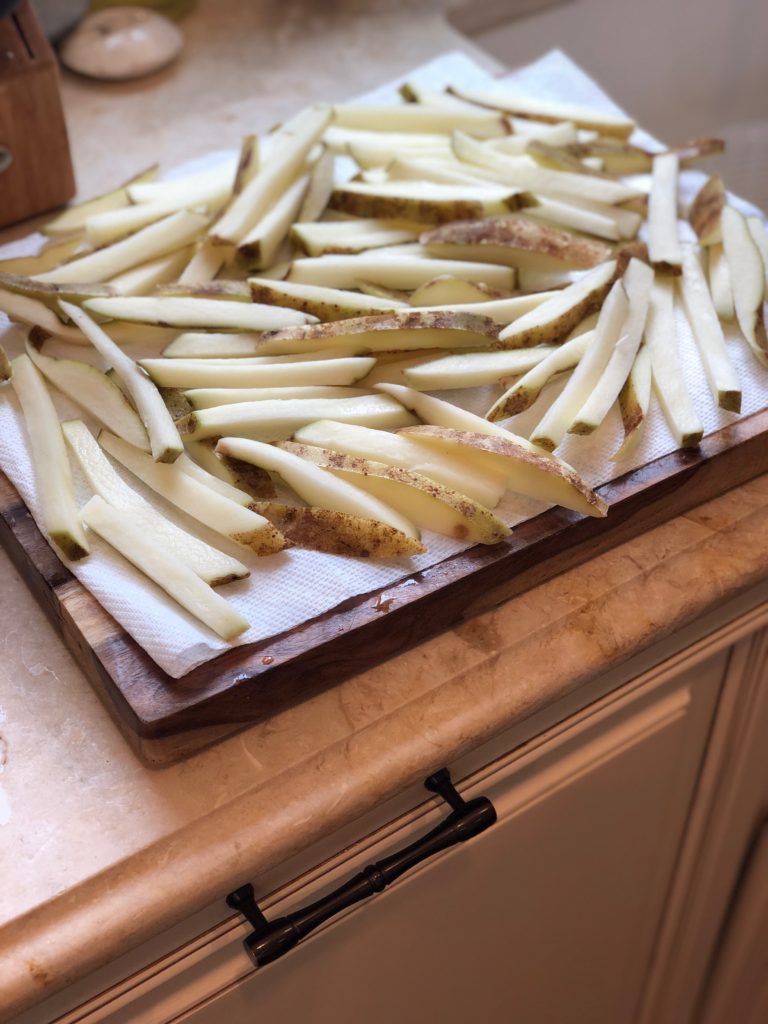
Wash 3 Russet potatoes and cut into sticks.

2

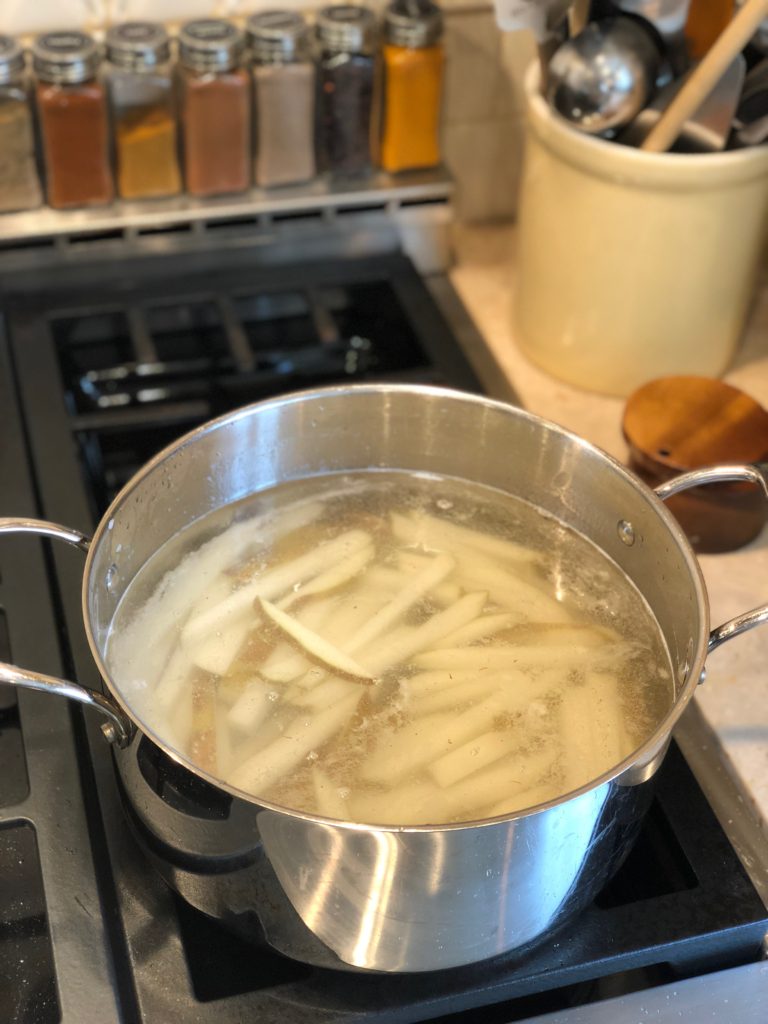
Toss raw potato sticks in a big bowl or pot of cold water, let them soak for 2 hours, this helps to get some of the starch out of the potatoes and makes for a better fry.

3

Strain all of the water out and dry the potato sticks completely with paper towels.

4

Pour peanut oil into a wide and deep saucepan, make sure the sides are high.

5

Heat up oil by turning the burner onto a medium heat, don't crank the burner too high.

6

Once the oil is hot enough (it should seriously sizzle but not splat if you drop one potato stick in to test it), put the potato sticks into the oil in batches, don't crowd them too much.

7

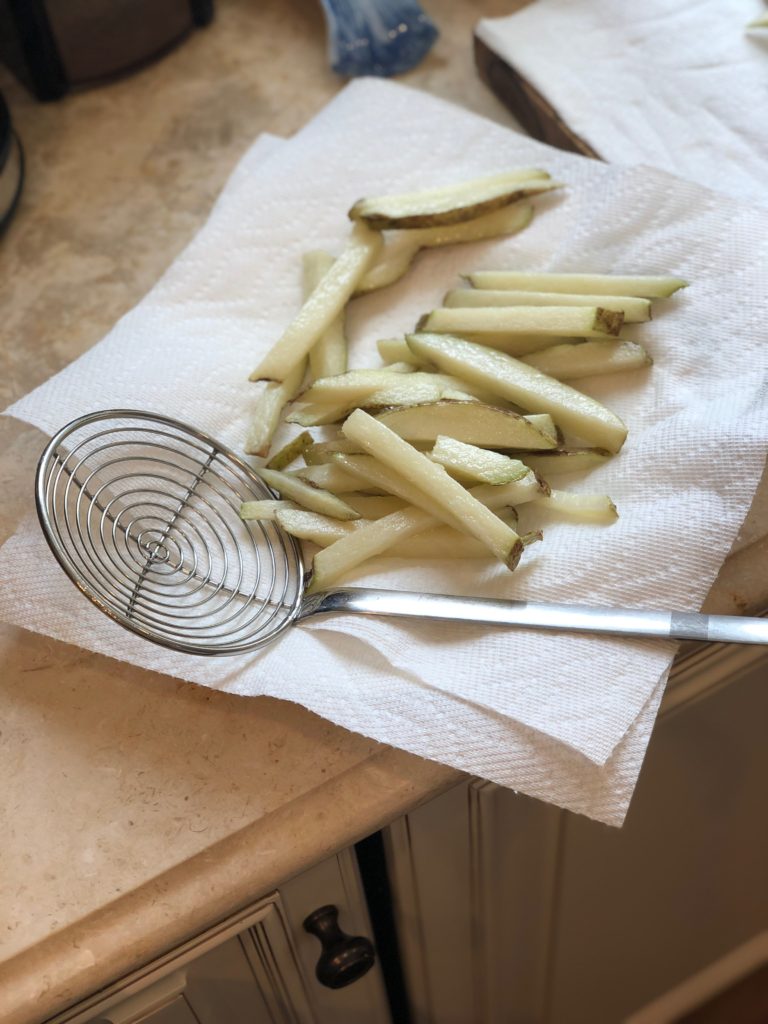
Wait about 3-4 minutes until the potatoes are soft but still white and also a little floppy, take them out and place them on a plate that's covered in a paper towel.

8

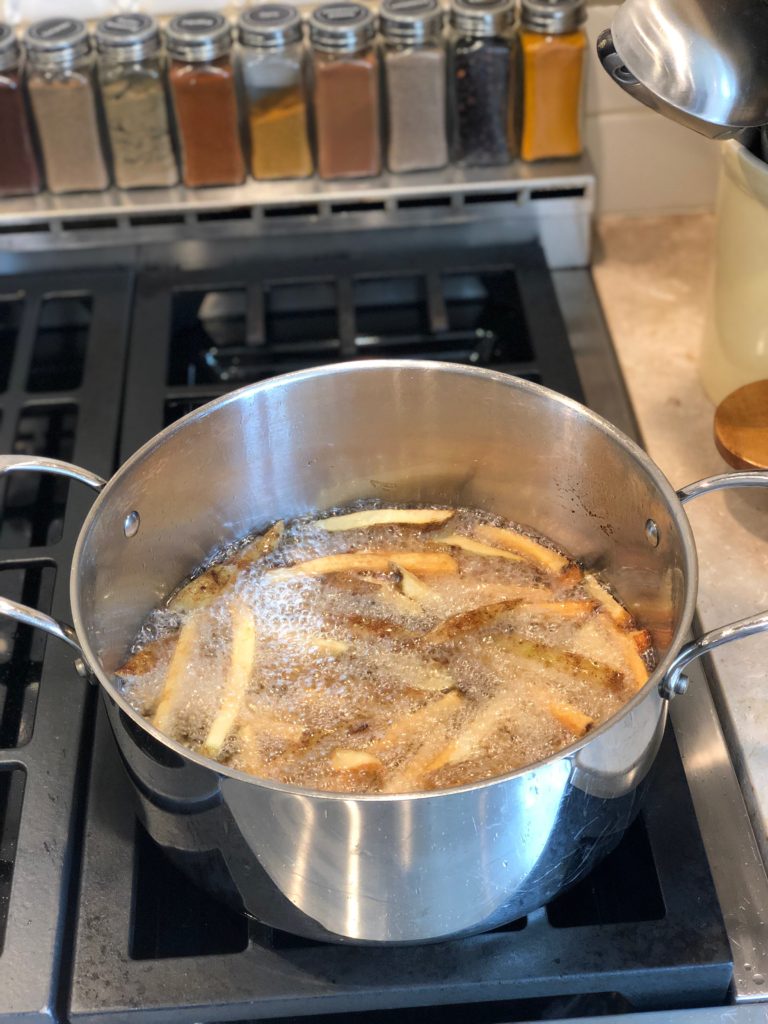
Now crank up the heat on the oil to medium high.

9

Put the potato sticks back in the oil in batches, and take them out once you see that they are all golden brown.

10

Please the golden brown fries onto a clean paper towel and IMMEDIATELY squeeze fresh lemon juice all over them and generously sprinkle with Old Bay seasoning.

11

Serve them warm.

Cutting the fries:

Soaking them in the cold water:

Drying them off:

After the first fry, white and floppy:

Second, high heat fry:

The final product:

Desserts

Versunkener Apfelkuchen (Sunken Apple Cake)

Versunken Apfelkuchen is a traditional and very popular German dessert.  The cake gets it’s flavor from the apples, of course, but also from Almond Extract. The combo of Apples and Almond Flavor is just divine. This cake is also very easy to make. It’s a great beginner cake in general. I make this cake once per year, for my friend’s annual Oktoberfest party, and it’s always a hit. Even if you don’t have an Oktoberfest party, it’s a fabulous fall dessert.

Versunkener Apfelkuchen (Sunken Apple Cake)

1 Star2 Stars3 Stars4 Stars5 Stars (No Ratings Yet)
Loading...
By Liz Serves: 30
Prep Time: 10 Minutes Cooking Time: 35 Minutes

I only make this recipe once per year for a big Oktoberfest party that my friends host. For that reason, this is a BIG recipe. You can cut the recipe in half and use a 9x13 rectangular pan instead. I also sliced the cake into thin pieces that were easy for people to pick up with their hands and eat at a party. See photos below to see the presentation for the party.

Ingredients

  • Cake:
  • 2 sticks of Salted Butter (Softened)
  • 1 1/2 cups Granulated Sugar
  • 4 eggs
  • 1 tablespoon Almond Extract
  • 1 cup Whole Milk
  • 2 tablespoons Baking Powder
  • 1 teaspoon Salt
  • 3 cups Cake Flour
  • 4-5 firm apples like Honeycrisp
  • Topping:
  • 1/2 cup Brown Sugar
  • 1/2 cup Unbleached All Purpose Flour
  • 1 teaspoon Cinnamon
  • 1/2 stick (1/4 cup) Salted Butter (Softened)
  • 1 1/2 teaspoons Almond Extract

Instructions

1

Preheat oven to 350 degrees.

2

Line a 18x13 half sheet pan with parchment paper, if any of the sides of the pan are not covered by the parchment, grease them with butter.

3

In your mixer, add Butter and Sugar and beat together until creamy.

4

Add the Eggs and Almond Extract and beat until creamy.

5

Add Baking Powder, and Salt until just combined.

6

Add half of the Flour and beat until just combined.

7

Add half the Milk and combine.

8

Add the rest of the flour and then the rest of the milk.

9

Beat just until combined, scraping down the sides of the bowl one time.

10

Spread the batter out in the sheet pan, on top of the parchment paper.

11

Peel, core, & slice the apples into thin slices.

12

Arrange the slices in four rows down the length of the pan, slightly layering them on top of the one before and then lightly push them down into the batter with your fingers.

13

To make the topping, mix the Brown sugar, Flour, and Cinnamon together.

14

Mash the softened Butter and Almond Extract into the topping with your hands until combined and crumbly.

15

Sprinkle the topping evenly over the apples.

16

Bake for 30 to 35 minutes, or until a toothpick inserted in the center of the cake comes out clean.

17

Let cool and then cut into slices to serve.

The apples all lined up on the cake batter:

The final cake with the topping in the oven:

This is how I served if for the party:

Soups, Salads & Bowls

Tomato & Mozzarella Salad

This isn’t so much a recipe, as it is assembly instructions.  So assemble this no-cook meal right away!  It takes 5 minutes, which is why during the work week, I tend to have it for dinner at least twice a week.  If you haven’t ever used a store bought balsamic reduction, I like to buy this one HERE.

Tomato & Mozzarella Salad

1 Star2 Stars3 Stars4 Stars5 Stars (No Ratings Yet)
Loading...
By Lizz Serves: 1
Prep Time: 5 Minutes

A quick and easy vegetarian salad that you can serve as a side or eat for a meal like I do!

Ingredients

  • 1 cup of Cherry Tomatoes, sliced in half
  • 8 Ciliegine (cherry size) Fresh Mozzarella Balls, sliced in half
  • 1 Tablespoon Extra Virgin Olive Oil
  • Drizzle of Balsamic Reduction 
  • Sea Salt to taste
  • Freshly Ground Black Pepper

Instructions

1

Put sliced cherry tomatoes and sliced mozzarella balls into your bowl.

2

Pour olive oil over it all evenly.

3

Drizzle with the balsamic reduction.

4

Sprinkle with the salt to taste (I tend to use a full teaspoon if not more), and lastly sprinkle some freshly ground black pepper on top.

5

Eat and enjoy.

Soups, Salads & Bowls

Chickpea and Sweet Potato Quinoa Bowl

This is a delicious and healthy lunch, and also a great vegan option. You can even roast the chickpeas and sweet potato ahead of time and store in the fridge and use them on your bowl the next day. Be sure to make my Spicy Miso Dressing to serve with it.

Chickpea and Sweet Potato Quinoa Bowl

1 Star2 Stars3 Stars4 Stars5 Stars (No Ratings Yet)
Loading...
By Liz Serves: 1
Prep Time: 10 minutes Cooking Time: 30 Minutes

A lovely vegan lunch idea, served with my Spicy Miso Dressing.

Ingredients

  • 1 can of Chickpeas
  • 1 Sweet Potato or Yam
  • 2 tablespoons Olive Oil
  • 1 teaspoon Sea Salt
  • 1/2 teaspoon Pepper
  • 1/2 cup Tri-Color Quinoa, prepared
  • 2 handfuls of Arugula
  • 1/4 Avocado
  • Red Onion, sliced very thin
  • 1 bunch of Cilantro, chopped

Instructions

1

Preheat oven to 425 degrees.

2

Drain and rinse the Chickpeas and then spread them on one half of a sheet pan.

3

Chop the Sweet Potato into bite-sized chunks with the skin on and spread on the other half of the sheet pan.

4

Pour the 2 tablespoons of Olive Oil evenly over the Chickpeas and Sweet Potato.

5

Sprinkle the Sea Salt and the Pepper evenly over both of them.

6

Now you have to get your hands dirty, toss all of this all together with your hands, still keeping the Chickpeas and the Sweet Potato separate, until the oil, salt and pepper coats all of the pieces evenly.

7

Let roast for 30 minutes.

8

Meanwhile, prepare the Quinoa by putting 1/2 cup of Quinoa and 1 cup of water in a pot. Bring to a boil, and as soon as reached a boil, cover the pot and turn burner to low. Let this cook for about 10-15 minutes until all the water is absorbed and then turn off the burner.

9

After 30 minutes, take the sheet pan out of the oven.

10

Assemble your salad by putting the handfuls of Arugula down, then putting the 1/2 of the Quinoa in next to the Arugula. Then put 1/2 of the Sweet Potato next to that.

11

Add the Chickpeas, Avocado, Red Onion and Cilantro on top.

12

Dress with my Spicy Miso Dressing and serve.

Cocktails

Spicy Basil Screwdriver

This is sort of a Screwdriver 2.0.  I clearly love spicy things, and you can certainly tone down the spice by using a couple less slices of Serrano pepper.  The basil adds such a unique flavor dimension and really makes this cocktail more sophisticated.

Spicy Basil Screwdriver

1 Star2 Stars3 Stars4 Stars5 Stars (No Ratings Yet)
Loading...
By Liz Serves: 1
Prep Time: 5 minutes

Not your mama's screwdriver.

Ingredients

  • 4 thin slices of Serrano Pepper
  • 3 Basil Leaves
  • 2 shots (or 3 oz) of Stoli Orange Vodka
  • 3 shots (or 4.5oz) of Orange Juice
  • 1 teaspoon Agave Nectar
  • Dash of Orange Bitters
  • For Garnish:
  • 2 slices Serrano Pepper
  • 2 small Basil Leaves

Instructions

1

Drop the Serrano pepper slices, the Basil leaves and one shot of Orange Juice in the bottom of a glass or martini shaker, using a pestle macerate the Basil and Serrano for about 30 seconds.

2

Add the 2 shots of Vodka, the rest of the Orange Juice, the Agave and the bitters.

3

Fill the cup with ice, cover and shake vigorously for about 30 seconds.

4

Strain as you are pouring into your glass (can use a lowball or martini glass).

5

Garnish with a couple Serrano Pepper Slices and Basil Leaves.

6

Sip and enjoy.

Main Dishes

Cuban Picadillo

Picadillo is a classic Cuban comfort food dish. Each Latin country has their own version, and every family has their own version as well. You will find many variations that add potatoes, olives or even raisins. I like mine very classic with none of the extras. Growing up, picadillo was a staple in our house. It’s so simple and satisfying, hopefully it will become a staple in your house too.

Cuban Picadillo

1 Star2 Stars3 Stars4 Stars5 Stars (No Ratings Yet)
Loading...
By Liz Serves: 6
Prep Time: 5 Minutes Cooking Time: 20 Minutes

This recipe is an easy one for the weeknights. It also saves in the fridge and reheats beautifully.

Ingredients

  • 2 tablespoons Olive Oil
  • 1 medium sweet Onion, diced
  • 3 cloves of Garlic, minced
  • 1 pound of 85% lean Ground Beef
  • 1 8 oz can of Tomato Sauce
  • 1/2 6 oz can of Tomato Paste
  • 1 teaspoon Salt
  • 1/2 teaspoon Cayenne Pepper
  • 1/2 teaspoon Black Pepper
  • 1 Bay Leaf

Instructions

1

Pour olive oil into a shallow sauce pan and bring to a medium high heat.

2

Add the diced onion.

3

Sauté the onion until they become golden and soft.

4

Add the garlic and stir once more, cooking for about 1 minute.

5

Add the ground beef and break apart as it cooks.

6

Cook until all of the ground beef is browned.

7

Add the tomato sauce and tomato paste and stir into ground beef until blended.

8

Add the salt and both peppers and stir again.

9

Add the bay leaf and then cover the sauce pan, turning the heat down low.

10

Simmer for about 15 minutes.

11

Serve hot on top of rice.

Onions go into the hot Olive Oil:

Once onions are soft, add the garlic:

Add the ground beef and break it apart with the spoon:

Once it’s browned it will look like this:

Add the tomato sauce and the tomato paste:

Then it will look like this, add the bay leaf and seasonings:

Desserts

Violet Gelato

When visiting a tiny village in France called Puycelsi, I happened upon an ice cream shop in a neighboring village. They had a flavor called Violette. I tried it and was hooked. It tasted like a cross between grape and bubblegum, but in a very delicate way. Of course, gelato is not French, but I love how the lower fat content in gelato (more milk, less cream) really lets the flavor shine through. So I adapted my gelato recipe and found some violet extract, which you can buy here.

Violet Gelato

1 Star2 Stars3 Stars4 Stars5 Stars (4 votes, average: 3.25 out of 5)
Loading...
By Liz Serves: 8
Prep Time: 40 minutes Cooking Time: 10 minutes

This is a great make ahead dessert. Make it the day before to serve at a dinner party. It's delightful color and unique flavor will surprise your guests and make you look like a star.

Ingredients

  • 3 cups of Whole Milk
  • 1 cup of Heavy Cream
  • 1 cup of Granulated Sugar
  • 1/2 teaspoon of Salt
  • 8 Egg Yolks
  • 3 drops of Violet Extract
  • Violet Food Color

Instructions

1

Pour milk and cream in a large saucepan and bring to a simmer over medium heat.

2

Remove the saucepan from the heat.

3

Meanwhile, whisk the egg yolks, sugar, and the salt together in a heatproof bowl with an electric hand mixer until pale yellow.

4

Bring the temperature of the egg mixture up by ladling a little of the hot milk mixture into the egg mixture, and mix fully into eggs. Then ladle in a little more of the hot milk and mix again.

5

Lastly, pour the entire egg/milk mixture to the saucepan and incorporate fully with the rest of the milk.

6

Bring the heat back to medium, stirring constantly with wooden spoon, until the custard reaches 195°F on a thermometer.

7

Immediately turn off the heat and then strain the custard through a fine mesh strainer into a new heatproof bowl.

8

Chill the entire bowl over an ice bath (which means putting your bowl into an even bigger bowl that is half-filled with ice water), stirring constantly for 5 minutes.

9

Add the Violet extract and stir again.

10

Transfer to a storage container with lid and chill in the fridge for 5 hours (you can also chill overnight).

11

Before churning, add the violet food color. I used Wilton Violet Icing Color. Add a very small amount (just a dab) and stir. See if you like the color, if you want more, you can always add more until you achieve the color you want, but do it in very very tiny increments.

12

Churn the gelato in an ice cream maker according to the manufacturer's instructions.

13

The gelato will still be soft and will need to go into the freezer for about 8 hours (or overnight).

14

I served mine with some fresh violets (that I found at my local Stop n Shop) and it really makes a beautiful presentation with minimal effort.

Main Dishes

Tagliatelle

I love this recipe because you do not need a pasta maker. The only tools you need are a flat surface to make the pasta (I use a Roul Pat, which is a big silicone mat), a rolling pin and a knife.

Tagliatelle

1 Star2 Stars3 Stars4 Stars5 Stars (No Ratings Yet)
Loading...
By Liz Serves: 6
Prep Time: 20 minutes Cooking Time: 2 minutes

This pasta only has 2 ingredients and is a great weekend meal to make and get your family involved. You can obviously use this recipe to make ravioli or farfalle by hand as well.

Ingredients

  • 2 large Eggs
  • 2 cups Unbleached All Purpose Flour
  • Sea Salt for Boiling

Instructions

1

Make a mound of flour in the center of the table and then make a well in the middle of the mound.

2

Crack the eggs into the well.

3

Start by beating the eggs together inside the mound, just like its a bowl, using your fingers or a fork.

4

Once the eggs are beaten, gradually pull in more flour from the sides of well with your fingers.

5

Continue pulling in more and more flour until it starts to become more solid, eventually you will have a ball of dough.

6

Sprinkle a bit more flour on your flat surface and being to knead the dough. You will know when the dough is read because it will feel as smooth as a baby's butt when you pat it.

7

Let the dough rest for 30 minutes.

8

Now you can start to roll the dough out with your rolling pin.

9

The old-time way to know that the dough was thin enough, was if you could put a newspaper under the dough and be able to read the newspaper. This means, it must be VERY thin. If you have any paper with black type around, definitely try this.

10

Once the dough is thin enough, sprinkle a bit more flour on top and place your rolling pin on top of the dough on one side.

11

Roll the dough up around the rolling pin and continue rolling until it is all rolled up.

12

Pull the rolling pin out from the center of the roll of dough, and dough will fall slightly to form a more flat roll.

13

Using a sharp knife, begin at one end of the flat rolling cutting thin strips.

14

When you are done, you can unravel each strip and voila! you have a Tagliatelle noodle.

15

Once you have all your noodles are all cut, get your water ready by adding a teaspoon or so of salt to some boiling water.

16

Drop the noodles into the water and cook for 2 minutes.

17

Top with your favorite sauce or even just some butter.

The mount of flour with the eggs in the well:

The dough after kneading:

The rolled out dough:

The dough rolled up inside the rolling pin:

The flat rolled up dough, once you pull out the rolling pin:

Cutting the strips:

Unraveling the strips to reveal the noodles:

Sides

Zucchini Fritters with Yogurt Sauce

This is the recipe that can turn any staunch non-vegetable eater into green machine. Serving them with the tangy yogurt sauce adds a delightful tangy balance.

Zucchini Fritters with Yogurt Sauce

1 Star2 Stars3 Stars4 Stars5 Stars (No Ratings Yet)
Loading...
By Liz Serves: 8
Prep Time: 10 minutes Cooking Time: 20 minutes

I use shallots in my zucchini fritters because they help give a more mild onion-y flavor. The parmesan cheese also helps to give another savory dimension. Frying in a cast iron pan give them ultimate flavor and crispness.

Ingredients

  • 2 medium-large sized Zucchinis
  • 2 Shallots, peeled
  • 2 large Eggs
  • 1/2 cup Unbleached All Purpose Flour
  • 1/4 cup grated Parmesan Cheese
  • 1 teaspoon Salt
  • 1 teaspoon freshly ground Pepper
  • Canola Oil for frying
  • YOGURT SAUCE
  • 1 cup of 0% Fat Greek Yogurt (FAGE is best)
  • Juice of one Lemon
  • 1 tablespoon Olive Oil
  • 1 teaspoon Garlic Powder
  • 1 teaspoon Salt
  • 1 teaspoon Pepper

Instructions

1

Shredding the zucchini in a food processor using the grating blade is the best, fastest and easiest way, but you can also grate by hand, using a grater.

2

Slice the zucchini in half, lengthwise and feed them into the food processor.

3

Then feed each shallot in one at a time.

4

Next, dump the entire bowl of shredded zucchini and shallot into the center of a thin kitchen towel and gather the towel up around the shredded veggies and squeeze as much of the water out as you can.

5

Dump all of the wrung-out veggies into a bowl.

6

Add the eggs, flour, parmesan cheese, salt and pepper.

7

Stir everything together until incorporated.

8

Preheat oven to 200 degrees and place a sheet pan with a cooling rack on top, in the oven together.

9

Pour canola oil into a cast iron skillet, just enough to cover the bottom and put on a medium to medium high heat.

10

Test oil heat by dropping a little zucchini shred in the oil, if it sizzles madly, its ready (if it splats and spurts and goes insane, its a little too hot).

11

Once oil is ready, grab a clump of the zucchini mixture in your hand (enough to cover 3/4 of your palm) and gently place in the oil. Repeat this depending on how big your pan is, mine could only fit 2 comfortably.

12

Flatten them out a bit with a spatula, they should look about 4 inches in diameter.

13

Let cook for about 2 minutes and then flip over (they should be golden brown)

14

Cook an additional 2 minutes on the other side and then flip again and let cook for 1 more minute.

15

Place finished fritters on top of the cooling rack in the 200 degree oven to stay warm. The cooling rack allows the dry heat to get underneath the fritter and keep them all crisp while they wait for their friends.

16

Continue this until you have made all of the fritters.

17

To make the yogurt sauce, mix yogurt, lemon juice, olive oil, garlic powder, salt and pepper together in a bowl.

18

Take the fritters out of the oven and serve warm with a dollop of yogurt sauce.

Yogurt Sauce:

Everything in the bowl:

Frying in the cast iron pan:

Desserts

Vanilla Cinnamon Whipped Cream

It is so easy and infinitely more delicious to make your own whipped cream.  I add vanilla and cinnamon to mine to make it extra flavorful.

Vanilla Cinnamon Whipped Cream

1 Star2 Stars3 Stars4 Stars5 Stars (No Ratings Yet)
Loading...
By Liz Serves: 8
Prep Time: 5 Minutes

Once you make this whipped cream, you'll never go back to the can.

Ingredients

  • 1 cup Heavy Whipping Cream
  • 1/3 cup Sugar
  • 1 Teaspoon Vanilla Extract
  • 1/2 Teaspoon Cinnamon

Instructions

1

Pour Heavy Cream into a large bowl and beat with an electric mixer on high speed.

2

Once it becomes a little thicker, gradually add the sugar, continuing to beat it all together, until all sugar is combined.

3

Keep beating the cream until the whipped cream can form stiff peaks (about 1 Minute) when you pull the beaters out. (You can stop beating the cream to test this.)

4

Then add Vanilla and Cinnamon and beat until just incorporated.

5

Serve immediately.