Monthly Archives:

September 2018

Sides

Ratatouille

Ratatouille is a delicious french country vegetarian dish made from summer vegetables.  Because of of the comfort and warmth of this dish, it makes a lovely winter dish as well. It can be served on it’s own or as a delicious side dish.


Ratatouille

1 Star2 Stars3 Stars4 Stars5 Stars (No Ratings Yet)
Loading...
By Liz Serves: 8
Prep Time: 15 minutes Cooking Time: 90 minutes

I've taken a traditional ratatouille and added potatoes. Ratatouille can be sliced and diced in a variety of ways, but making it with the vegetables in thinly sliced rounds makes it as appealing to the eye as it is to your mouth.

Ingredients

  • VEGETABLES
  • 2 Russet Potatoes
  • 2 Eggplants
  • 2 Zucchinis
  • 2 Yellow Squashes
  • 3 small Tomatoes (you can also use plum tomatoes)
  • TOMATO SAUCE
  • 2 tablespoons Olive Oil
  • 1 sweet Onion, diced
  • 6 cloves Garlic, finely diced
  • 1 Red bell pepper, diced
  • 1 Green bell pepper, diced
  • 1 can (28 oz) of San Marzano crushed tomatoes
  • 1 cup of dry White Wine (like Sauvignon Blanc)
  • 10 leaves fresh Basil julienned (fancy for sliced into long strips)
  • 2 teaspoons Salt
  • 1 teaspoon Pepper
  • HERB DRESSING
  • 1 tablespoon Thyme Leaves (fresh)
  • 3 tablespoons Olive Oil
  • 2 teaspoons Garlic Powder
  • 1 teaspoon Salt
  • 1/2 teaspoon Pepper

Instructions

1

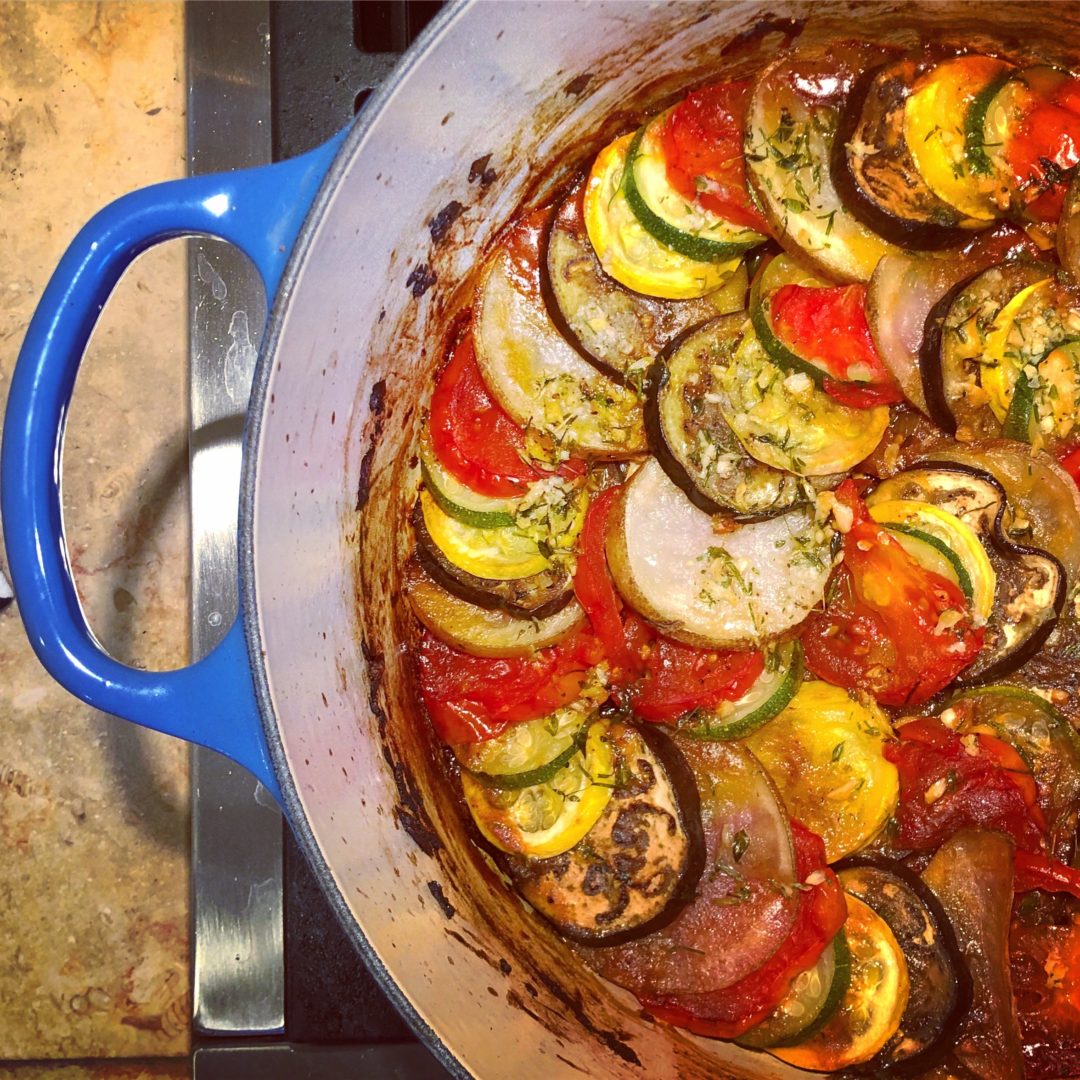
Slice the eggplant, zucchini, squash, potato and tomatoes into thin rounds and then line them up on a sheet pan in rows

2

Preheat your oven to 400 degrees

3

Now you are ready to make the tomato sauce, with the burner on Medium High, start by pouring the 2 tablespoons of olive oil into a dutch oven type saucepan (you need a big one for this because you want a lot of surface area to lay down the vegetables)

4

Add the onion, garlic, and bell peppers and saute them until fully soft (about 8-10 minutes)

5

Pour in the can of crushed tomatoes, the white wine and add the basil and stir all together, let that simmer for about 5 minutes

6

Take the saucepan off the heat

7

Now take your sliced vegetables and place them on top of the sauce, in a circle following the edge of the saucepan. Alternate eggplant, zucchini, squash, potato, tomato and then again and again. One you complete that circle, start a new smaller circle in the middle, and on and on until you have covered all of the sauce with the vegetables

8

Season the vegetables by drizzling the herb dressing over the top, evenly distributing it across all of the vegetables

9

Cover the saucepan with the lid or some aluminum foil and bake for 45 minutes

10

Uncover, then bake for another 15 minutes

11

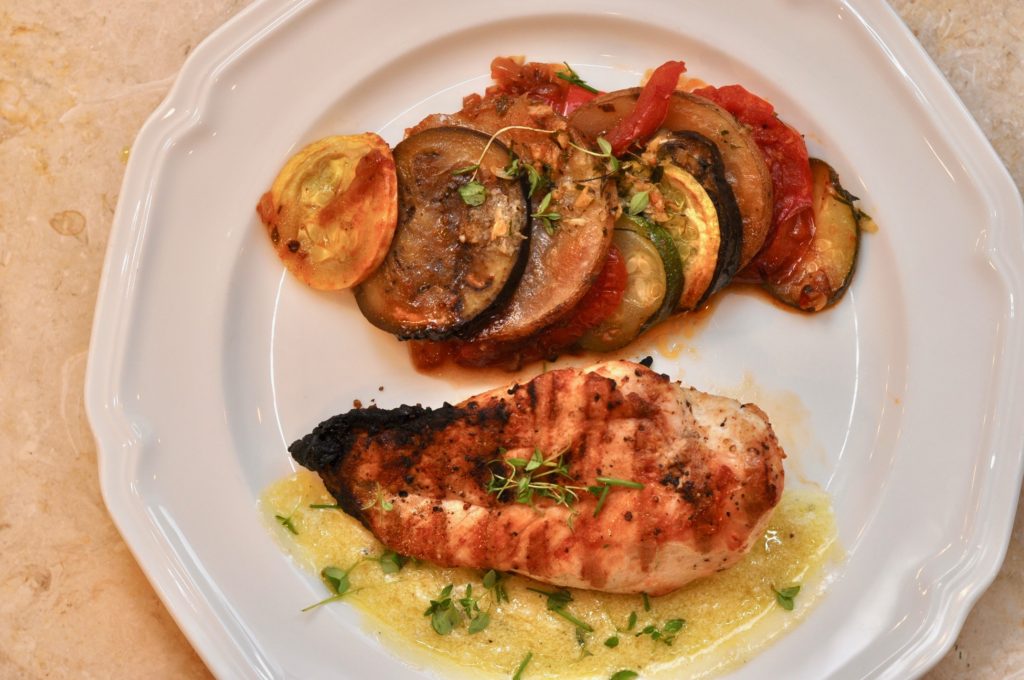
Serve family style out of the pan or serve vegetables on each plate, keeping them in the same pattern from the pan by scooping one serving up all together


Desserts

Olive Oil Gelato

If you have never had Olive Oil Gelato and you are skeptical that the savory taste of olive oil will work in ice cream, I promise you it does.

Olive Oil Gelato

1 Star2 Stars3 Stars4 Stars5 Stars (No Ratings Yet)
Loading...
By Liz Serves: 8
Prep Time: 40 minutes Cooking Time: 10 minutes

I love to make this the day before I'm planning a big Italian or Greek meal, it's the perfect ending as the olive oil flavor pairs so well as a sweet ending to these two cuisines.

Ingredients

  • 3 cups of Whole Milk
  • 1 cup of Heavy Cream
  • 1 cup of Granulated Sugar
  • 8 Egg Yolks
  • 2 teaspoons of Pure Vanilla Extract
  • 1/2 teaspoon of Sea Salt
  • 1/2 cup Extra Virgin Olive Oil

Instructions

1

Pour milk and cream in a large saucepan and bring to a simmer over medium heat.

2

Remove the saucepan from the heat.

3

Meanwhile, whisk the egg yolks, sugar, and the salt together in a heatproof bowl with an electric hand mixer until pale yellow.

4

Bring the temperature of the egg mixture up by ladling a little of the hot milk mixture into the egg mixture, and mix fully into eggs. Then ladle in a little more of the hot milk and mix again.

5

Lastly, pour the entire egg/milk mixture to the saucepan and incorporate fully with the rest of the milk.

6

Bring the heat back to medium, stirring constantly with wooden spoon, until the custard reaches 195°F on a thermometer.

7

Immediately turn off the heat and then strain the custard through a fine mesh strainer into a new heatproof bowl.

8

Chill the entire bowl over an ice bath, stirring constantly for 5 minutes.

9

Add Vanilla extract and stir again.

10

Transfer to a storage container with lid and chill in the fridge for 5 hours (you can also chill overnight).

11

Churn the gelato in an ice cream maker according to the manufacturer's instructions.

12

Add the olive oil about halfway through the churning process.

13

The gelato will still be soft and will need to go into the freezer for about 8 hours (or overnight).

14

Serve the gelato by drizzling extra virgin olive oil on top along with some Maldon Sea Salt Flakes.

Cocktails

Spicy Aperol Margarita

This cocktail is what happens when an Aperol Spritz and a Spicy Maragarita have a baby.  Let me tell you, it’s a delightfully delicious orange baby.

Spicy Aperol Margarita

1 Star2 Stars3 Stars4 Stars5 Stars (No Ratings Yet)
Loading...
By Liz Serves: 1
Prep Time: 5 Minutes

This recipe replaces Cointreau or Tripe Sec with Aperol and uses seltzer water for a little refreshing effervescence.

Ingredients

  • 1.5 oz of good Silver Tequila
  • 1.5 oz of Aperol
  • 1.5 oz of freshly squeezed Lime Juice
  • 1 tablespoon Agave Nectar
  • 2 dashes of Orange Bitters
  • 4 thin slices of a Serrano Pepper
  • Ice
  • 3/4 cup of Seltzer Water or Club Soda

Instructions

1

Measure out liquors and Agave and pour into your glass.

2

Using a mortar and pestle, or anything you can smash with, take the 4 slices of Serrano Pepper and mash them.

3

Pour a tiny bit of the liquor mixture in the mortar (bowl) and keep mashing.

4

Once it is all significantly mashed, pour the whole mixture back into your cocktail glass, add Orange Bitters and gently stir.

5

Add a generous amount of Ice.

6

Top with Seltzer Water until glass is almost full.

7

Gently stir once more and enjoy!


Sides

Tomato Pie

I categorized this under sides, but it truly can be main event as well.  I often make this to bring to summer pot luck bbq’s and it always goes in flash.


Tomato Pie

1 Star2 Stars3 Stars4 Stars5 Stars (No Ratings Yet)
Loading...
By Liz Serves: 8
Prep Time: 15 minutes Cooking Time: 25 minutes

This is a delightfully simple dish to make that is stunningly gorgeous and equally delicious.

Ingredients

  • 1 Pie Crust for a 9 inch Pie Dish (either make my recipe or use a frozen prepared one)
  • 4 Tomatoes, preferably yellow and red, sliced
  • 1 cup of Yellow Cherry Tomatoes, cut in half
  • 1 cup of Red Cherry Tomatoes, cut in half
  • 3 cloves of Garlic, minced
  • 1 cup of Bread Crumbs (I use the plain store-bought breadcrumbs)
  • 1/2 cup shredded Mozzarella cheese
  • 1/2 cup sherdded Pecorino cheese
  • 1/2 teaspoon Sea Salt
  • 2 tablespoons of fresh Basil Leaves, julienned (fancy for cut into thin strips)
  • 1/2 teaspoon Freshly Ground Black Pepper

Instructions

1

Preheat the oven to 400 degrees

2

Line a 9 inch pie pan with pie crust (either make your own or use a store bought crust)

3

Prick the crust all over with a fork and bake until JUST lightly browned (about 10 minutes)

4

While the pie crust is cooking you can throw all the sliced tomatoes in a mixing bowl.

5

Add salt, pepper, garlic and basil on top of tomatoes and then stir so that everything is evenly distributed over the tomatoes. Then let the tomatoes/spice mixture sit for about 10 minutes

6

Remove the crust and set aside but leave the oven on

7

In a new bowl, combine the cheeses and bread crumbs, now you have 2 bowls of goodness to layer into your pie crust

8

Start by making a thin layer of the bread crumb and cheese mixture in the bottom of the pie crust so it just covers the pie crust and you can't see it anymore

9

Next, make a layer of the tomato mixture on top. It's best to you some sort of slotted spoon for this as you don't want all that liquid to melt the pie crust

10

Make another bread crumb/cheese layer, and then another tomato layer, finishing with the bread crumb and cheese mixture on the top

11

Bake the pie for about 25 minutes

12

It's most delicious served warm

Desserts

Chocolate Chip Cookies with Sea Salt

These cookies are what started my obsession with baking. It’s a simple cookie recipe with a few tweaks. I’ve been making these for almost 30 years and what makes them so great is not only the recipe, but the techniques I use to make sure the cookies are softest, chewiest and slightly crispiest  you’ve ever had. Depending on where you live, sometimes the Maldon Sea Salt flakes can be hard to find, you can buy them HERE.

Chocolate Chip Sea Salt Cookies

1 Star2 Stars3 Stars4 Stars5 Stars (2 votes, average: 5.00 out of 5)
Loading...
By Liz Serves: 2 1/2 dozen
Prep Time: 6 minutes Cooking Time: 24 minutes

The key to make the most perfect cookie is taking them out of the oven at the right moment. The other key is mixing them by hand. Unless you are super seasoned cookie maker, it is very easy to over mix by using a mixer. If you mix by hand, you will ensure that you do not over mix and hence your cookies will have an amazingly tender texture when they are baked.

Ingredients

  • 2 sticks SALTED Butter, softened
  • 1/2 cup Granulated Sugar
  • 3/4 cup Brown Sugar
  • 1 Egg
  • 2 teaspoons Pure Vanilla Extract
  • 1 teaspoon Baking Soda
  • 1/2 teaspoon Fine Sea Salt or regular Table Salt
  • 2 cups unbleached all purpose flour
  • 1/2 of a 12 oz bag of Guittard Super Cookie Chips or Semi-Sweet Chocolate Chips
  • Maldon Sea Salt for Sprinkling on top

Instructions

1

Preheat oven to 350 degrees

2

Add softened butter (either leave them out to bring them to room temp, or zap them in the microwave for about 15 secs) and sugars to a large mixing bowl and stir together with a wooden spoon (superstition of mine) until they become one

3

Add egg and vanilla to the bowl and stir once again until they become one

4

Add baking soda and salt to the mixture and stir once again

5

Add flour, one half at a time to the bowl. Once the first half is incorporated fully, add the second half and stir with spoon until incorporated

6

Add the chocolate chips and stir until they are evenly distributed throughout the dough

7

Drop 2 tablespoon sized chunks of dough onto an ungreased cookie sheet, spaced about an inch apart on all sides.

8

THIS IS THE MOST CRITICAL STEP IN THE TECHNIQUE TO HAVING SOFT CHEWY COOKIES: Bake the cookies for 10-12 minutes. After 10 minutes, watch them closely, as soon as you see some golden highlights on only a FEW (not all) of the cookies, take them out of the oven. Some of cookies will look slightly undone still, do not worry, they continue cooking once they are out of the oven and this ensures that they are soft and chewy.

9

Immediately sprinkle the Maldon Sea Salt Flakes on top of the cookies right when they come out of the oven.

10

Let them cool for about 3 minutes and then transfer them to a cooling rack, using a spatula, to cool completely.

Softened butter and sugars into the bowl:

Blended together until they become one:

Add vanilla and egg:

Blended together until creamy:

Salt and Baking Powder into the bowl:

Blended well and distributed evenly throughout:

Half the flour:

Second half of flour added after blending the first half completely:

Now the dough should look like this, soft but not too sticky:

Add chips and stir:

Onto the baking sheet they go:

Soups, Salads & Bowls

Cauliflower Gruyere Soup with Roasted Cauliflower

This soup is the perfect combo of healthy and comfort. It’s mostly broth and veggies with a little help from a roux and and some Gruyere cheese to make it creamy.  Adding the roasted cauliflower as a garnish at the end gives this soup another dimension.

Cauliflower Gruyere Soup with Roasted Cauliflower

1 Star2 Stars3 Stars4 Stars5 Stars (No Ratings Yet)
Loading...
By Liz Serves: 4
Prep Time: 5 Minutes Cooking Time: 25 Minutes

This soup is so easy to make and so delicious that is sure to become a staple for you this winter.

Ingredients

  • 1 tablespoon Butter
  • 1 tablespoon Unbleached All Purpose Flour
  • 1 head Cauliflower chopped
  • 1 tablespoon Olive Oil
  • 1 medium Sweet Onion chopped into 6 pieces
  • 3 cups Chicken Broth
  • 6 ounces of Gruyere Cheese chopped into 6 pieces
  • 3 teaspoons of Salt
  • 1 1/2 teaspoon of freshly ground Black Pepper (I like a lot, but you can use less)

Instructions

1

Heat oven to 425 degrees.

2

Chop the cauliflower.

3

Take about 1/4 of cauliflower pieces and spread onto a sheet pan, pouring the tablespoon of olive oil over the cauliflower pieces, sprinkle with 1 teaspoon of sea salt and 1/2 teaspoon of Black Pepper.

4

Put sheet pan into 425 degree oven.

5

In a medium saucepan, make the roux by melting the butter on low heat.

6

Add the flour to the melted butter and stir for about a minute and then add the chicken broth to the roux.

7

Add the onion chunks and remaining cauliflower to the saucepan.

8

Turn up the heat to medium and once it starts to boil, cover it and let the whole thing simmer for about 15 minutes.

9

Once vegetables are tender, puree the whole thing with an immersion blender right in the pot.

10

Add the chunks of gruyere cheese, let it sit for about 1 minute so cheese begins to melt, then add the salt and pepper and puree once more with the immersion blender.

11

Cover the saucepan once more but turn off the burner and remove the saucepan from the heat.

12

By now the cauliflower pieces in the oven should be golden brown, if they are not yet, keep an eye on them until they look perfectly crispy and remove sheet pan from oven.

13

Serve the soup by ladling it into a bowl and place the roasted pieces of Cauliflower in the middle.

14

Garnish with a little bit of Extra Virgin Olive Oil.

Breads

Pita Bread

Making your own pita bread will make you wonder why you haven’t always done it.  Nothing and I mean nothing can compare. It does take a little planning ahead, but it’s so worth it.


Pita Bread

1 Star2 Stars3 Stars4 Stars5 Stars (No Ratings Yet)
Loading...
By Liz Serves: 10
Prep Time: 45 min Cooking Time: 30 min

This delicious recipe uses a little bit of whole wheat flour to give the pita more depth of flavor.

Ingredients

  • 1 pkg Active Dry Yeast (make sure you get this kind and not the Instant kind)
  • 1 teaspoon Sugar
  • 1 1/2 cups Warm Water
  • 1 teaspoon salt
  • 3 cups Bread Flour
  • 1/2 cup Whole Wheat Flour

Instructions

1

In the bowl that you use for your electric mixer, add the yeast, sugar, and warm water. Stir them together with a spoon until the yeast is dissolved completely.

2

Let the mixture sit for about 5-8 minutes until it gets foamy.

3

Add the salt, this is important, don't forget this step.

4

Add the dough hook attachment to your mixer

5

Once your mixer is ready to go with the dough hook, turn your mixer is on the lowest speed and then add the whole wheat flour.

6

Then start to add the bread flour a little at a time, until all of the flour has been incorporated and the dough gathers into one ball.

7

Plop the dough ball onto a floured surface and knead by hand until it's smooth. (About 8 minutes.) When you pat the dough, it should feel like you are patting a baby's butt.

8

Grease a large bowl with olive oil.

9

Put the smooth dough into the oiled bowl and cover it with a damp towel.

10

Put the covered bowl in a warm spot and let it rise until double in size, should take about 1 1/2 hours.

11

Take the dough out of the bowl and place it back on the flat surface.

12

Divide the dough evenly into 10 pieces, and make each piece into a ball and line them up in rows on the flat surface.

13

Cover all 10 balls with a damp towel and let them rest for about 15 minutes.

14

Roll each dough ball into a 6-inch circle that is 1/4-inch thick with a rolling pin.

15

Cover the circles with the damp towel after you make them.

16

Heat a cast iron pan to medium high on your stove top.

17

Cook each pita dough circle, one at a time on the cast iron pan.

18

Let the pita cook for about 3 minutes and then flip over and cook for another 1-2 minutes. The bread should puff up while on the pan. It will deflate when you take it off the heat.

19

As each pita is done cooking, put them in a bowl or basket that is lined with a towel and put another towel on top of the bowl to cover it and keep the pitas warm.

Spreads, Dressings & Sauces

Lemon Garlic Hummus

Disclaimer: I do not make my hummus with tahini! This is simply because I do not like tahini.  (Sorry Tahini!) Instead of tahini, I use Safflower Oil for the fat in my hummus.  This really allows the garlic and the brightness from the lemon to shine through.


Lemon Garlic Hummus

1 Star2 Stars3 Stars4 Stars5 Stars (No Ratings Yet)
Loading...
By Liz Serves: 8
Prep Time: 10 minutes

A deliciously bright and flavorful hummus that does not use Tahini.

Ingredients

  • 1 can of Chickpeas, drained and rinsed
  • 1/3 cup freshly squeezed Lemon Juice (about the juice of 3 lemons)
  • 1/3 cup of Safflower Oil or Grapeseed Oil
  • 3 cloves of Garlic
  • 1 teaspoon Onion Powder
  • 1 teaspoon of Sea Salt
  • 1 teaspoon of Freshly Ground Pepper
  • Olive Oil and Pine Nuts for garnish

Instructions

1

Put all of the ingredients into a food processor with the regular blade.

2

Turn the food processor on and let it whirl until you have a creamy smooth texture.

3

Garnish with olive oil and pine nuts.

4

Store hummus for up to one week in a sealed container in the fridge.

Main Dishes

Seared Salmon with Zoodles

The healthiest meals can be the simplest to make. I made this healthy meal with just 5 ingredients: Salmon, Zucchini, Lemon, Olive Oil and Salt & Pepper.


Seared Salmon with Zucchini Noodles

1 Star2 Stars3 Stars4 Stars5 Stars (No Ratings Yet)
Loading...
By Liz Serves: 1
Prep Time: 3 Minutes Cooking Time: 12 Minutes

Sometimes the healthiest meals can be the simplest to make.  I used exactly 5 ingredients on this meal: salmon, zucchini, lemon, olive oil and salt & pepper.

Ingredients

  • 1 Filet of Salmon
  • 1 Cup of Zucchini Noodles (buy at the store pre-cut or cut yourself)
  • 1 Lemon
  • 2 Tablespoons Olive Oil
  • Salt & Pepper

Instructions

1

Put 1 tablespoon of olive oil in a hot pan (cast iron works best)

2

Once oil is hot, drop in your zucchini noodles

3

Occasionally flip the noodles (like a stir fry)

4

While the noodles are cooking, generously season your salmon filet on the fleshy fish side with salt and pepper

5

Once the noodles are brown on some parts and soft, take them out of the pan and put them to the side.

6

Now put the other tablespoon of olive oil in the pan

7

Once the oil is hot, lay your salmon filet down in the pan, skin side down

8

Once you see that the cooked part of the salmon has creeped halfway up the side of the fish, flip it over

9

Let the salmon cook until the top is nice and brown and crispy seared, about 3-4 more minutes

10

Take the salmon out and plate it next to the zucchini noodles

11

Generously squeeze lemon on the salmon and noodles

12

Salt and pepper the noodles to taste